In this article I’m going to show you how to upload image files with other form fields data in reactive forms. Before saving form data you can preview images that you uploaded into the form.
Here I have defined an angular FormBuilder inside app.component.ts and using it I have created an instance of a FormGroup . In it there are two form controls.
import { Component, OnInit } from '@angular/core';
import { FormGroup, FormBuilder, FormControl } from '@angular/forms';

@Component({
  selector: 'app-root',
  templateUrl: './app.component.html',
  styleUrls: ['./app.component.css']
})

export class AppComponent implements OnInit{

createForm: FormGroup

constructor(private fb: FormBuilder){}

ngOnInit() {
    this.createForm = this.fb.group({
      Brand: [''],
      Model: ['']
    });
  }
}
Make sure to register ReactiveFormsModule into app.module.ts
import { ReactiveFormsModule } from '@angular/forms';

@NgModule({
  imports: [
    .......
    ReactiveFormsModule
  ]
})
export class AppModule { }
Now my app.component.html looks like this. Here formControlName property is used to bind the <input> tag to individual form controls.
<div class="container">
  <div class="row">

    <form [formGroup]="createForm">
      <h3 class="header-title">Form</h3>

      <div class="form-row">
        <div class="form-group col-md-6">
          <label for="brand">Brand</label>
          <input type="text" class="form-control" id="brand" formControlName="Brand">
        </div>

        <div class="form-group col-md-6">
          <label for="model">Model</label>
          <input type="text" class="form-control" id="model" formControlName="Model">
        </div>
      </div>

      <button type="submit" class="btn btn-primary">Submit</button>
    </form>
  </div>
</div>
Now lets look at how to pick images into form and preview them before submitting. Here I have defined three variables in app.component.ts.
selectedFile is to use to hold the uploaded file. imgUrl is to hold the url represent the uploaded file data(in this context, image). images array is to contain those file urls.
selectedFile: File;
imgUrl: any;
images: any = [];
Lets define a file picker in the angular component template.
<input type='file' class="image-uploader" (change)="onSelectFile($event)" #fileInput/>Above #fileInput is because of I’m going to attach a button to that file upload control. Then we can hide that file picker control from the angular component template.
<button type="button" class="btn btn-default" (click)="fileInput.click()">
        Add Image <i class="fa fa-plus"></i></button>
<input type='file' class="image-uploader" (change)="onSelectFile($event)" #fileInput/>
To hide the file picker from the template, add the following style in app.component.css
.image-uploader{
    display: none
}
Now lets look at what is going on with onSelectFile() function. We are attaching change listener to that function. Here which will handle what happens if you select a file to upload.
Below is onSelectFile() function implementation in app.component.ts .
 onSelectFile(event) {
    this.selectedFile = event.target.files[0];

    if(this.selectedFile){
      var reader = new FileReader();
      reader.readAsDataURL(this.selectedFile);
      reader.onload = (event: any) =>
      {
          this.imgUrl = reader.result;
          this.images.push(this.imgUrl);
      }

    }
  }
Now I’m going to explain you what the above code do.
It simply checks uploaded file and if it’s true then creates an instance of FileReader. The FileReader object lets web applications asynchronously read the contents of files (or raw data buffers) stored on the user’s computer, using File or Blob objects to specify the file or data to read. The readAsDataURL method starts reading the contents of the specified file and, once finished, the result attribute contains URL represents the file’s data. Then it is pushed into images array.
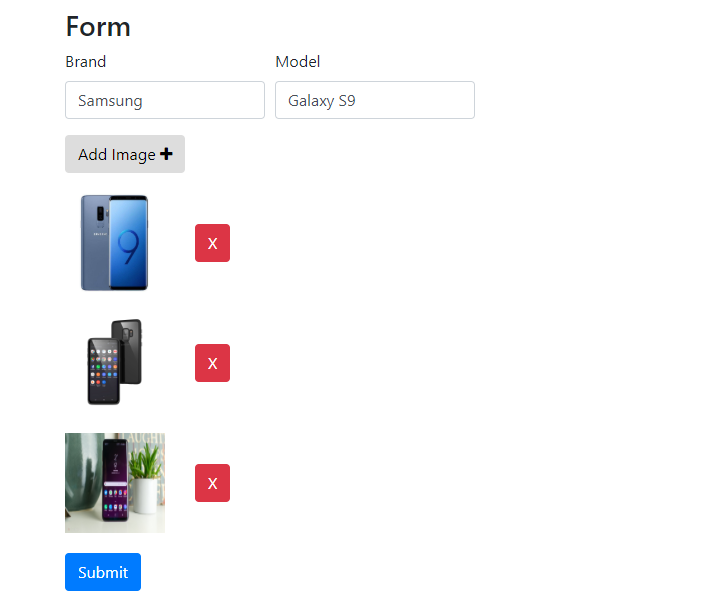
Lets modify angular component template to preview the images. Add following lines to app.component.html
 <div *ngIf="images.length > 0">
     <div *ngFor='let img of images;' class="image-preview">
         <img [src]="img" height="100" width="100">
     </div>
 </div>
Now I’m going make this form little better, adding remove buttons in front of each images. Lets modify above code as follows.
 <div *ngIf="images.length > 0">
     <div *ngFor='let img of images;' class="image-preview">
         <img [src]="img" height="100" width="100">
         <button class="btn btn-danger remove-image-button" title="Remove Image"
                (click)="removeImage(img)">X</button>
      </div>
 </div>
Lets implement removeImage() function in app.component.ts . It takes image url as the parameter then it checks the index of that url in images array. splice() method remove the item from its array.
removeImage(img: any){
    const index: number = this.images.indexOf(img);
    if (index !== -1) {
      this.images.splice(index, 1);
  }
  }
Now I’m going to show you how to pass all form contents with images into server. For that lets create a service called FormService. Add it into app.module.ts . Then inject FormService into your constructor.
app.module.ts
import { FormService } from 'src/app/service/form.service';

.......
  providers: [
    FormService
  ]
.......
app.component.ts
import { FormService } from 'src/app/service/form.service';

constructor(private fb: FormBuilder, private _formService: FormService){}
form.service.ts
import { Injectable } from '@angular/core';
import { HttpClient } from '@angular/common/http';
import { Observable } from 'rxjs';


@Injectable({
  providedIn: 'root'
})
export class FormService {

  constructor(private http: HttpClient) { }

  public save(formContents, images) {

    let formData =  new FormData();
    formData.append("FormContent", formContents);
    formData.append("Images", images);

    return this.http.post("backend-base-url/save-form", formData)
   }

}
Above FormService has a method called save(). It gets two parameters. One for form fields data and other one for image array. Then it creates an instance of FormData. Next we add fields with their values using the append() method of FormData. In our example, we are adding two fields named “FormContent” which holds the values of form fields data, and “Images” which holds images uploaded to the form. Finally we use the Post() method of HttpClient to send the form data to the server.
Finally I have implement onSubmit() function inside app.component.ts .
onSubmit() {
    this._formService.save(this.createForm.value, this.images).subscribe(
      (response: any) =>
      {
        if (response > 0) {
          console.log("success! " + response);
        }
        else{
          console.log("error occured! " + response)
        }
      });
  }
Github – https://github.com/techibruno/Image-Uploader
Reference –
https://www.academind.com/learn/angular/snippets/angular-image-upload-made-easy/
https://www.talkingdotnet.com/show-image-preview-before-uploading-using-angular-7/
